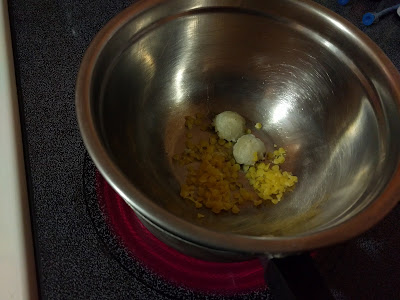
As with other ointments, we will melt and combine the ingredients using a double boiler set up (a bain-marie, if you want to be fancy). Here, I have simply nested a metal bowl into pan of water on the stove top, which is really all you need. I begin by melting the hardest ingredients first.
2 teaspoons of beeswax will harden the balm and provide a protective coating to the hair and a bit of hold to control scraggly beard hairs:
2 teaspoons of shea butter also helps harden the balm and provides extra conditioning qualities:
1 teaspoon of lanolin provides a superior protective coating (lanolin is basically the natural protective coating from sheep’s wool):
Here I stop and let it melt before moving on (I could probably have waited on adding the lanolin, as well):
Now that it is good and melted, I can proceed with adding softer ingredients:
1 tablespoon of coconut oil, which is solid at room temperature but melts quickly at only about 76°F, helps make the balm firm as well, but is also a conditioning oil rich in antioxidants:
1 tablespoon of extra virgin olive oil provides even more antioxidants than coconut oil and has a long history of use on skin and hair:
1 teaspoon of castor oil, which is well known for its beneficial properties for hair, also provides a bit of a healthy shine:
Now, before we add the aromatic essential oils, we remove the bowl from the hot water bath and allow it to cool until it just begins to harden. This way, we won’t lose volatile essential oils by overheating them. If it begins to harden too much, set the bowl back on the hot water bath briefly and stir it back in.
Once the essential oils of your choice are blended into the mixture, you are ready to pour it up into tins, ointment jars, etc. This tiny batch is enough to fill a 2 fl oz container:
Now, we let it sit until the liquid cools and hardens:
And here is the final product:
Base Recipe
- 3 parts Coconut oil
- 3 parts Olive oil
- 2 parts Beeswax
- 2 parts Shea butter
- 1 part Lanolin
- 1 part Castor oil
- a small amount of essential oils for fragrance
Here are some guidelines for safe dilution of essential oils (2 fl. oz. is 60mL). Another source you may find useful is AromaWeb, which has essential oil profiles that include safety information as well as descriptions.
Now that you have the basics down, here are a few of my favorite recipes to get you started. The amounts of the essential oils shown are the amount for one 2 oz. jar, like I made in the instructions above. The measurements are in milliliters, but remember there are about 20 drops per ml, so 1 drop = 0.05 ml, 2 drops = 0.1 ml, etc.
The Outdoorsman’s Blend
- 1.6 ml cedarwood essential oil
- 1.4 ml patchouli essential oil
- 1 ml balsam fir needle essential oil
- 0.6 ml rosemary essential oil
- 0.4 ml frankincense essential oil
The Woodworker’s Blend
- 3 ml cedarwood essential oil
- 0.6 ml myrrh essential oil
- 0.6 ml rosemary essential oil
- 0.4 ml patchouli essential oil
Cup O’ Joe
- 2 ml coffee CO₂-extract
- 0.1 ml cinnamon leaf essential oil
- 0.1 ml clove bud essential oil
- 0.1 ml vanilla CO₂-extract
Spice Master
- 0.2 ml clove bud essential oil
- 0.2 ml cinnamon leaf essential oil
- 0.1 ml clary sage essential oil
If you would rather buy pre-made beard balm or want to try it out before investing in the ingredients yourself, all four of these scents are available from my store on Etsy:


